Just to be absolutely clear: My app, Killer Sudoku Aide is not a game. It’s a reference tool/utility to help solve Killer Sudoku Games.
Killer Sudoku games are not killer Sudoku games. They are related, but different puzzles.
Preface
Want to help test Killer Sudoku Aide?
Join the TestFlight Beta Test and install on your Apple device now!
Several years ago, I got addicted to Killer Sudoku puzzles, not to be confused with “killer Sudoku puzzles.” I like them because the exercise the math part of my brain, and, I’ll say without too much boasting, I solve roughly 95-97% of them without the aide of anything.
However, once in a while, I resort to using a calculator, and, somewhat less often, I would turn to a Killer Sudoku Cage Combination reference sheet.
I hate using the reference sheets, not just because in the back of my head I think it’s a little bit of a failure on my part, but also because they suck to use.
As a lifelong computer programmer I’d wanted to try my hand at iPhone development, and a digital, user-friendly version seemed like a good fit. As I built the app, some obvious enhancements over the basics of a reference card became apparent, and I implemented those. The result is basically the Killer Sudoku Aide that has been in the App Store for 3 years.
Introduction for Testers
I’m actively soliciting help testing the latest version of the app through Apple TestFlight. This is an app you can install on your iPhone, iPad or Mac and, by accepting an invitation, can install a beta version of the app and help me test it.
If you’re not familiar with Killer Sudoku puzzles, you can try your hand at some Killer Sudokus here, and they even has an explanation of the rules. Playing some games will probably help with testing my program.
As for my application, you can test all facets of it, including in-app purchases without fear of being charged. I’ll explain more about that later.
I don’t that many people who play Killer Sudoku puzzles — in fact the number of people I know who play is zero. So, often people who help test the app are not very familiar to what it does.
This will be a detailed introduction to the app and what it is supposed to do, and why, so that if you are not familiar with Killer Sudoku puzzles you can test what it does.
We’ll go through this screen by screen.
Tutorial
When the app is newly-installed, after loading, it should first show you the tutorial. This tutorial is written on the assumption that you are a Killer Sudoku (KS) player and are familiar how the game works. If you are a KS player, please, go through the in-app tutorial first and let me know if I can clarify it further. You can replay the tutorial at any time on the Settings tab.
Combinations
The main tab, and most-used feature of the app is the Combinations Tab. It will normally be the first screen you see when you open the app.
In KS, groups of squares are called “cages,” and each cage will have a number in the upper-left square of the cage. That number presents the sum of the numbers that go in that cage. There can be no duplicate numbers in a cage.
So, for example, if the cage size (the number of squares) is 2, and the sum is 8, the only possible combinations that can be in that cage are
1+7 = 8
2+6 = 8
3+5 = 8
It cannot be 4+4 because there cannot be duplicate numbers in a cage.
Therefore, the numbers 1,2,3,5,6,7 are the only numbers in those squares within that cage, and those are in only three combinations, (1,7), (2,6), (3,5).
I’ll phase this as [8 in 2] to signify a sum of 8 in a cage size of 2.
[8 in 2] is quite easy, but, for example, [19 in 4] has 11 different combinations and the valid numbers as all 1-9. The reference doesn’t help much at that point until you start whittling it down. That is what this app is for.
So, it’s important to remember that a Killer Sudoku puzzle must also conform to all standard Sudoku rules:
- The board is a grid of squares 9X9 (81 squares)
- The board is broken in to 9 smallers grids of 3X3 (9 squares)
- Each smaller grid must contain each number 1-9 with no duplicates
- Each Row (9 squares) must contain each number 1-09 with no duplicates
- Each Column (9 squares) must contain each number 1-9 with no duplicates.
So, if you had a column that had the [8 in 2] cage in it, and elsewhere in that same row you had already figured out there was a “5” you can eliminate the (3,5) combination from your consideration.
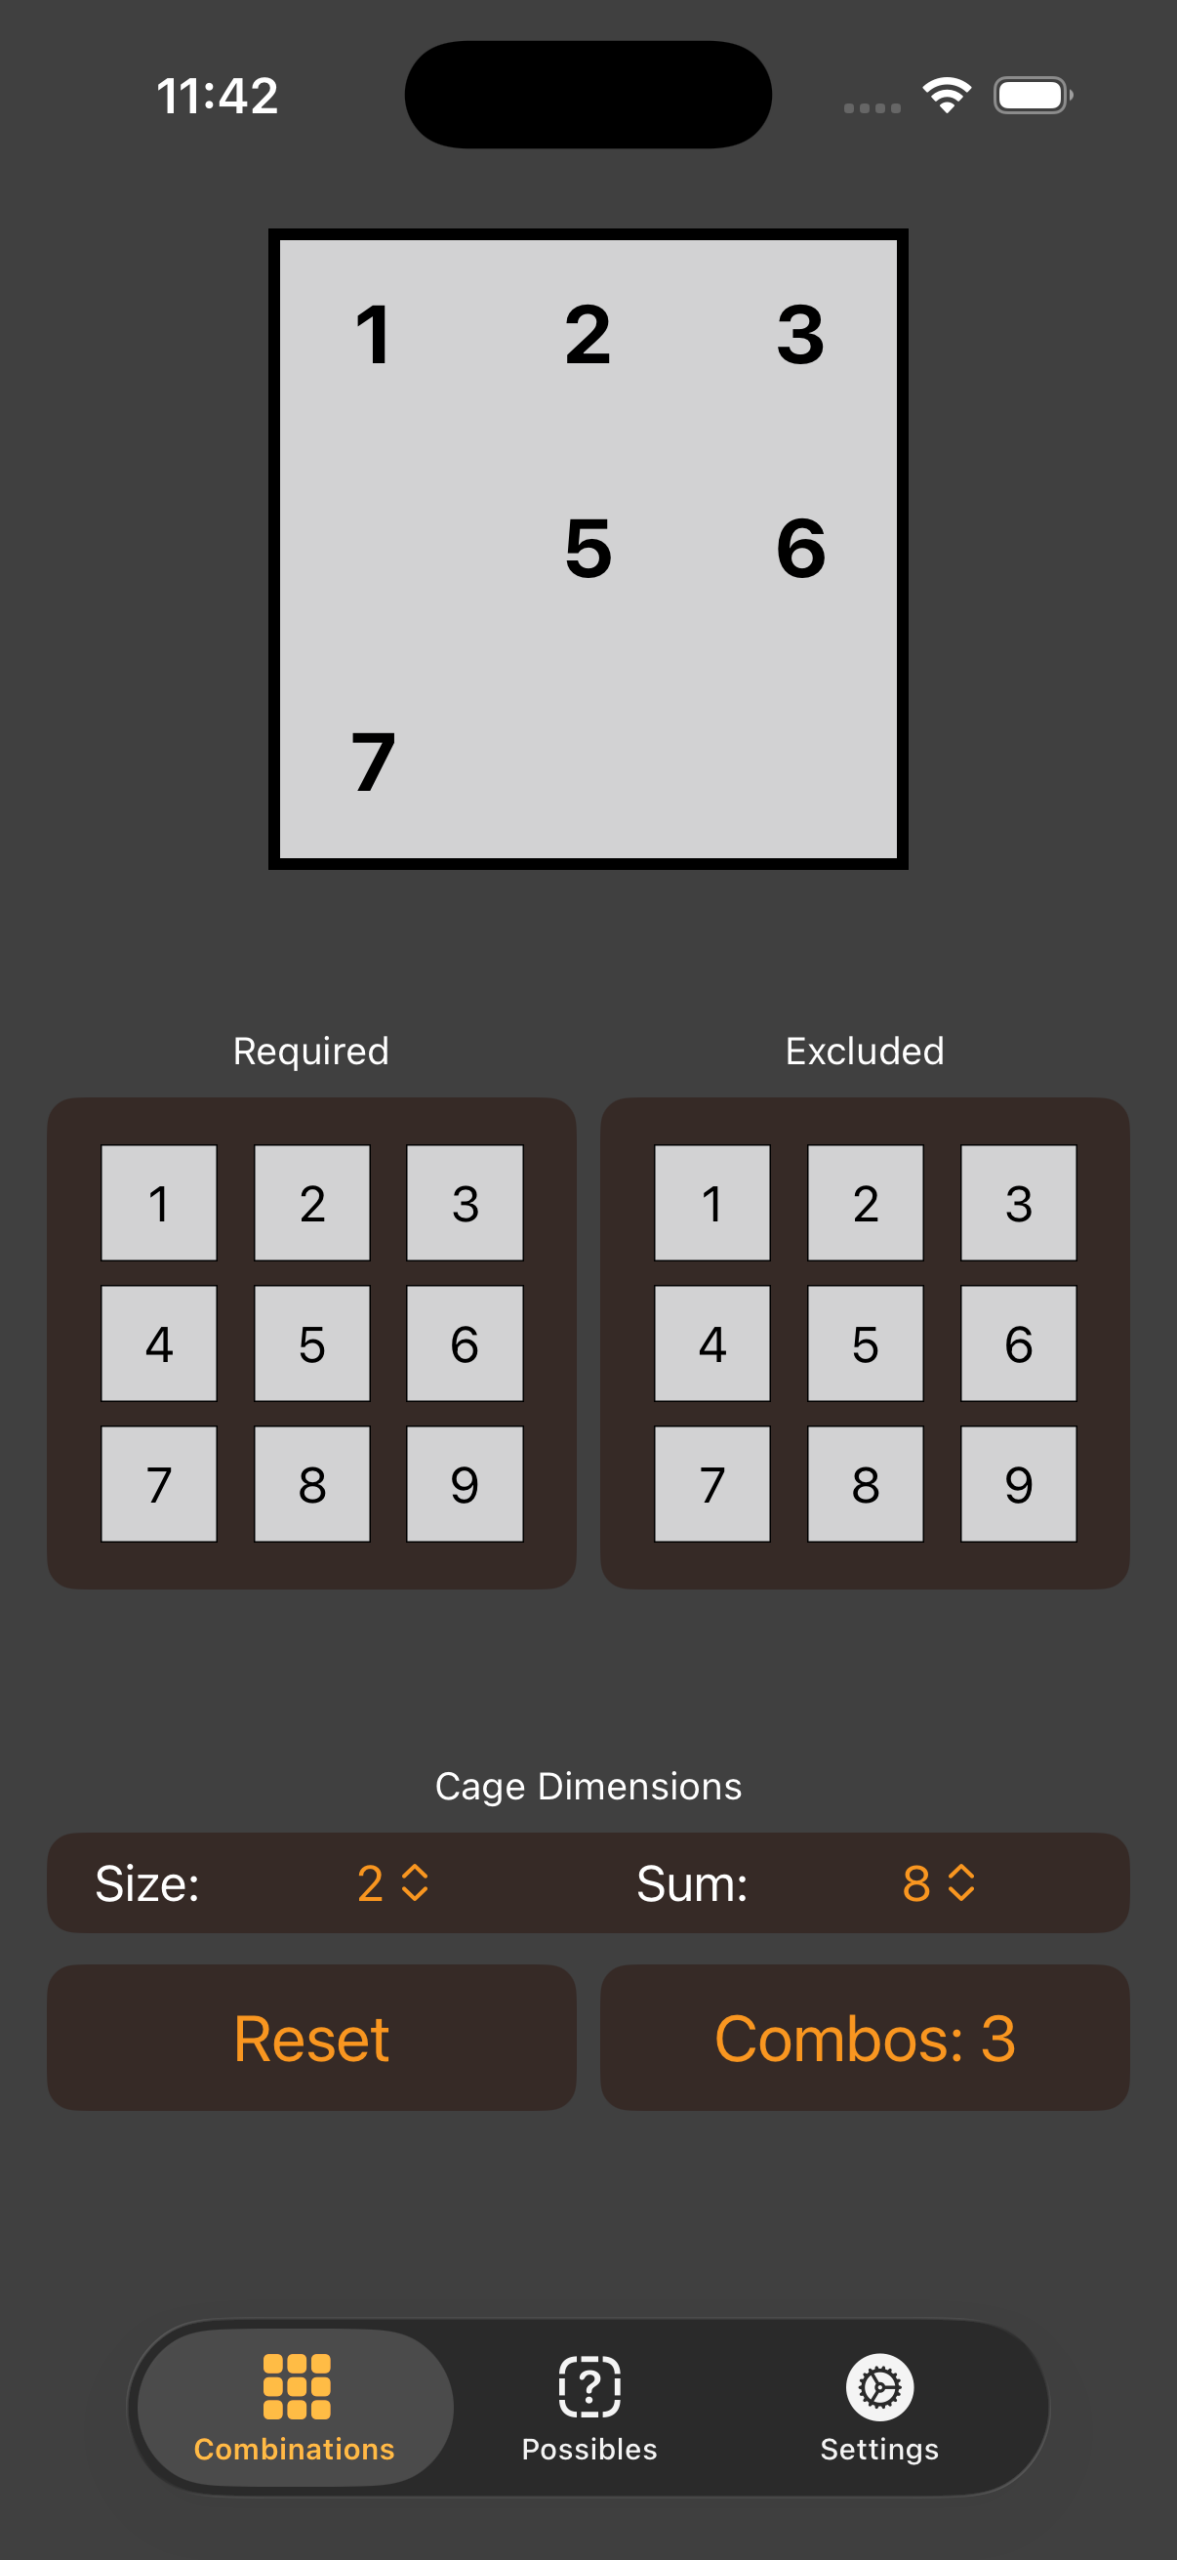
OK, let’s take a look at the screens. About 2/3 of the way down the screen you see pickers to select the Size and Sum. Select the Size first, as this will narrow down the options in the Sum picker.
For example, a Cage Size of 2 can only have sums between 3 and 17. 3 because the smallest combination you can have is (1,2) and 17 because the largest is (8,9).
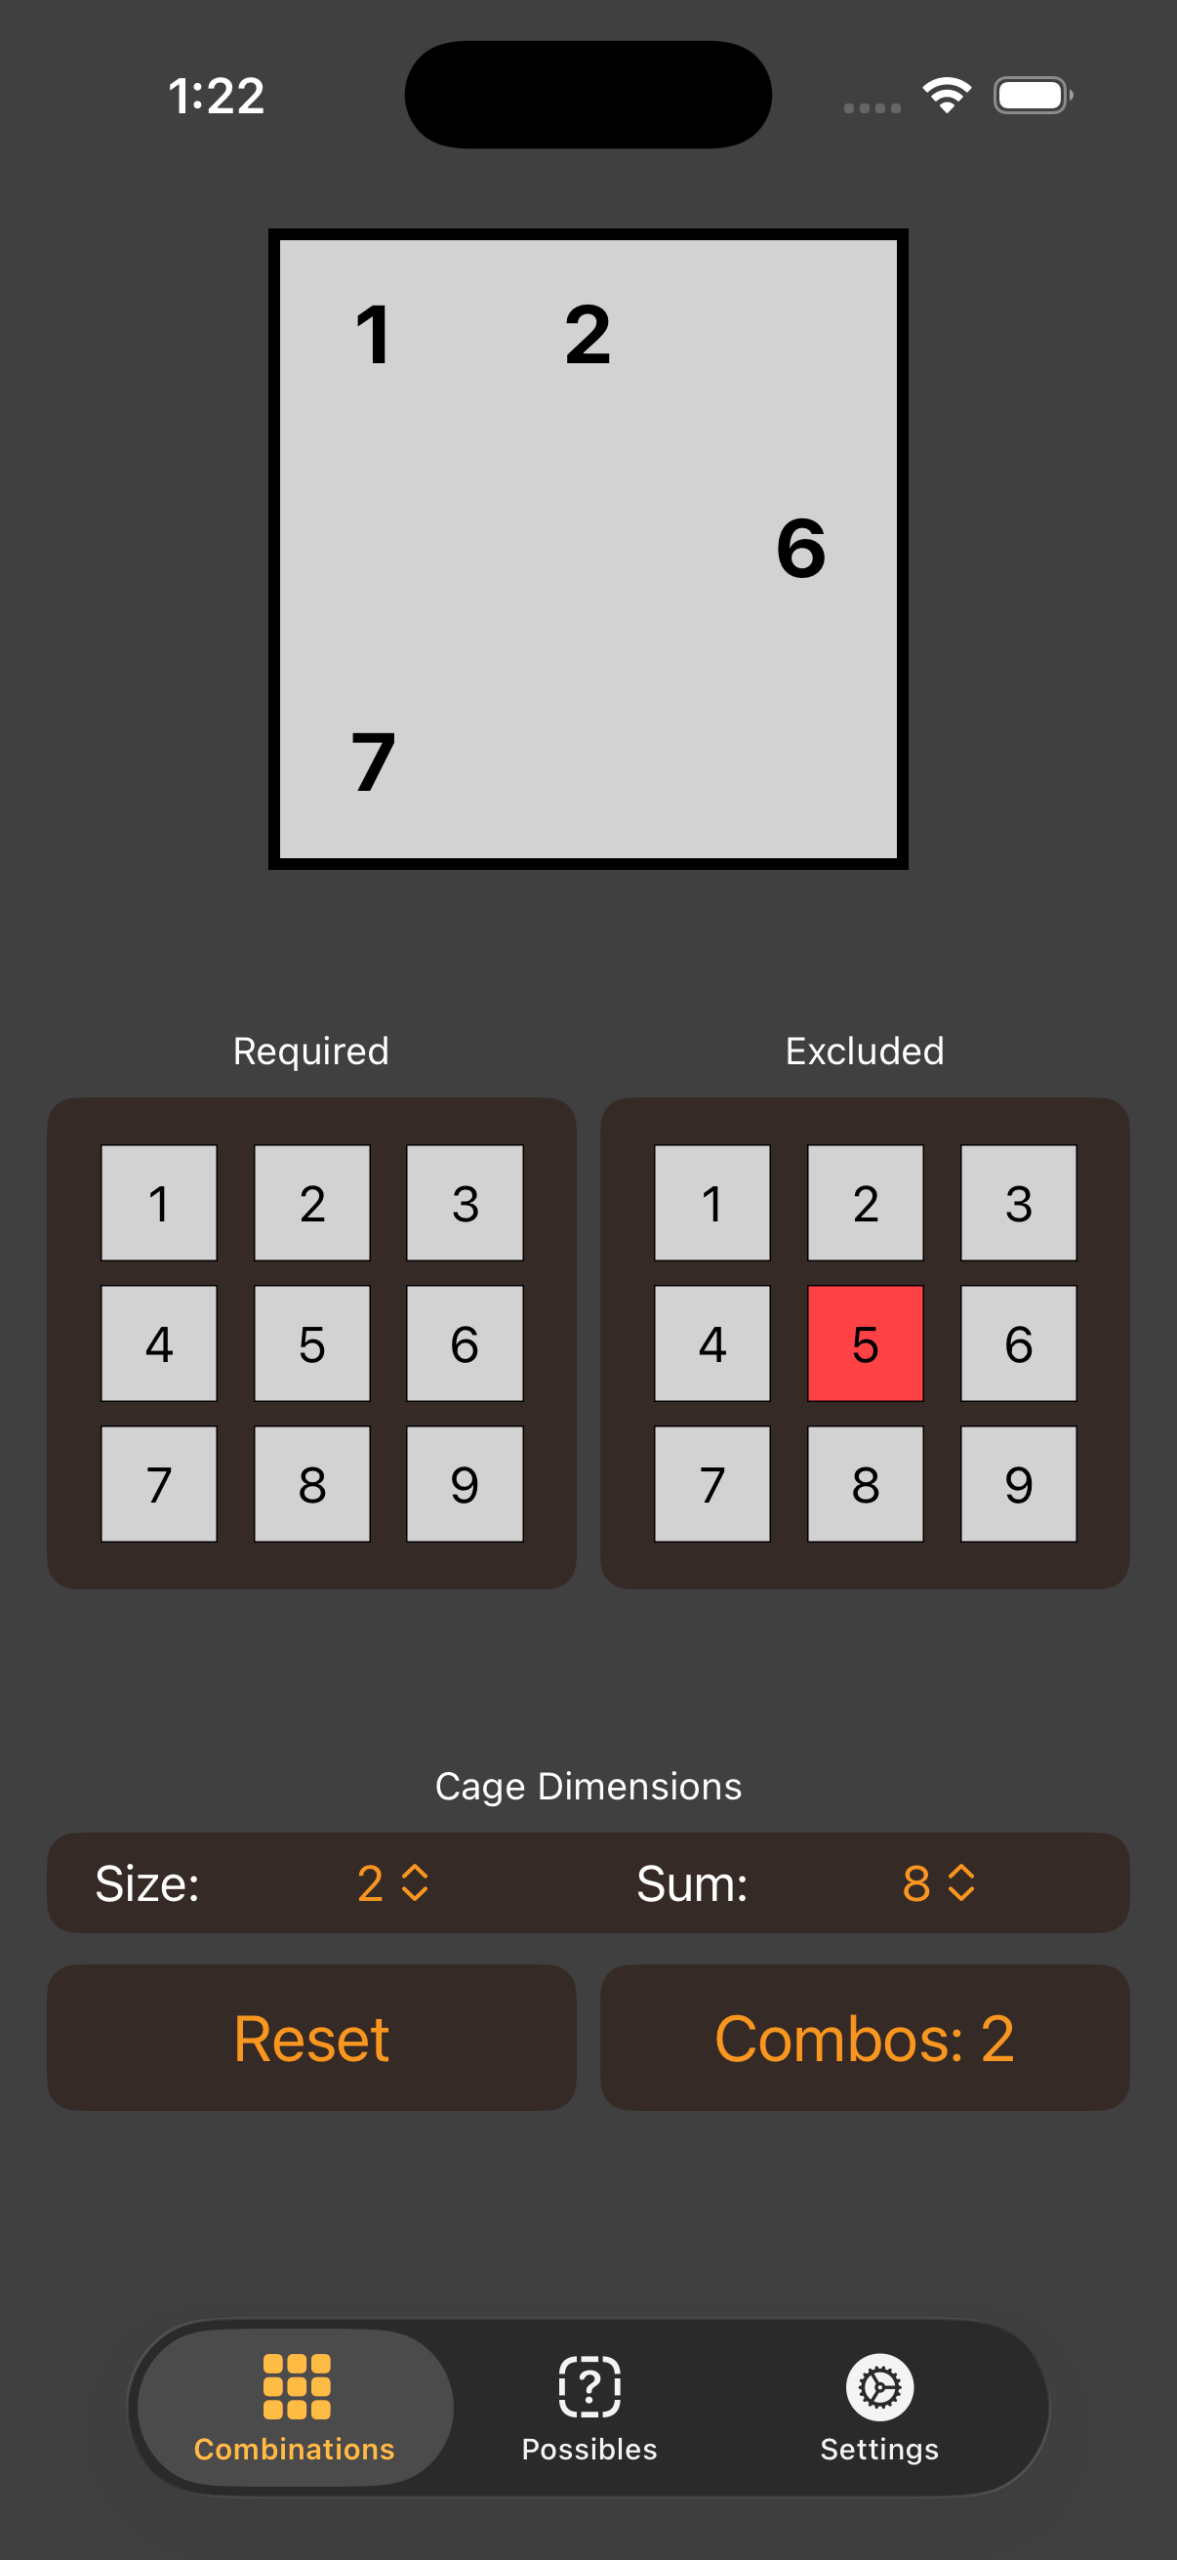
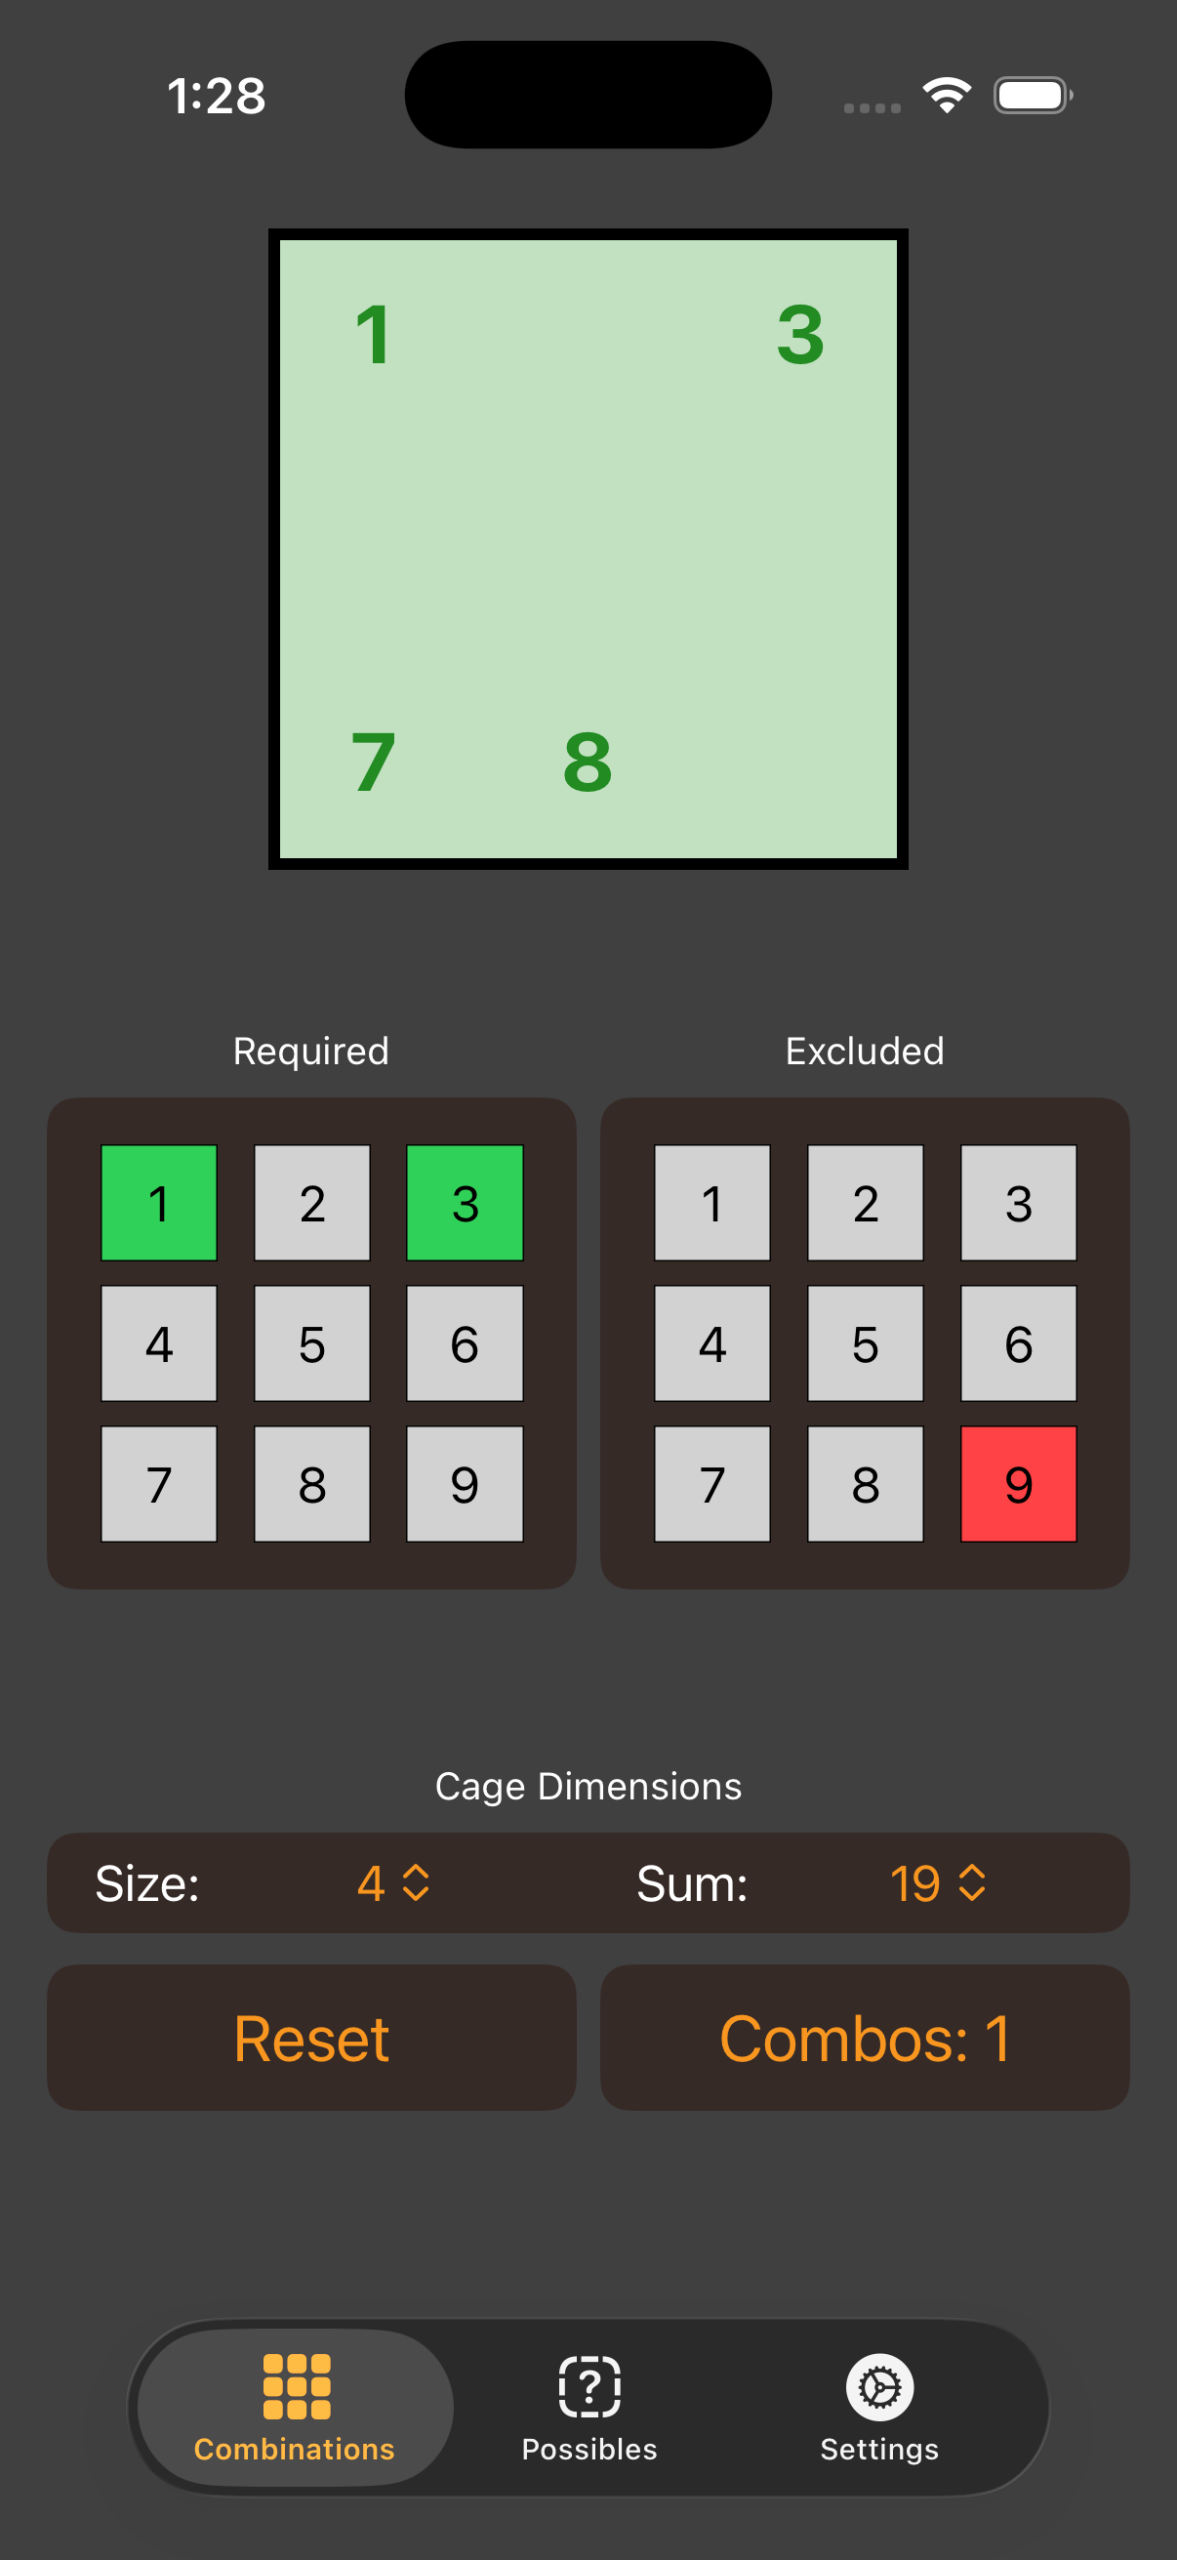
Select a Size of 2, then a Sum of 8, and the screen should look like this, with the top square filled in with (1,2,3,5,6,7). Each number has it’s own position because this is a common way that solvers annotate their puzzles when working out what might be in a square.
You’ll also note that there is a button that says “Combos: 3.” We’ll come back to that button later, but for the moment just note that it is telling you that these numbers are only three possible combinations ((1,7), (2,6), (3,5)) as mentioned above.
But in our example, we know one other piece of information: It cannot have a 5 in it. This is what the “Required” and “Excluded” grids are for.
5 is an “excluded” number, go ahead and press it and the screen changes. The top square no longer shows 5 or 3, the 5 in the Excluded square is red, and the Combos button now only shows there are 2.
By process of elimination, you can whittle down what might be in your cage. If you can narrow it down far enough, you will know exactly what can go in the cage.
Let’s look at the Required square next. It’s not very useful for a cage size of two, so let’s look at that other example, [19 in 4], that I mentioned earlier.
You can just change the picker values (Size first) and toggle the Excluded 5 off, or, just hit the Reset button to clear everything.
For [19 in 4], you’ll see that all 1-9 appear in the top square reflecting the fact that, barring further information, it could be anything. You’ll also see there are 11 combinations.

Go ahead and hit the Combos button now.
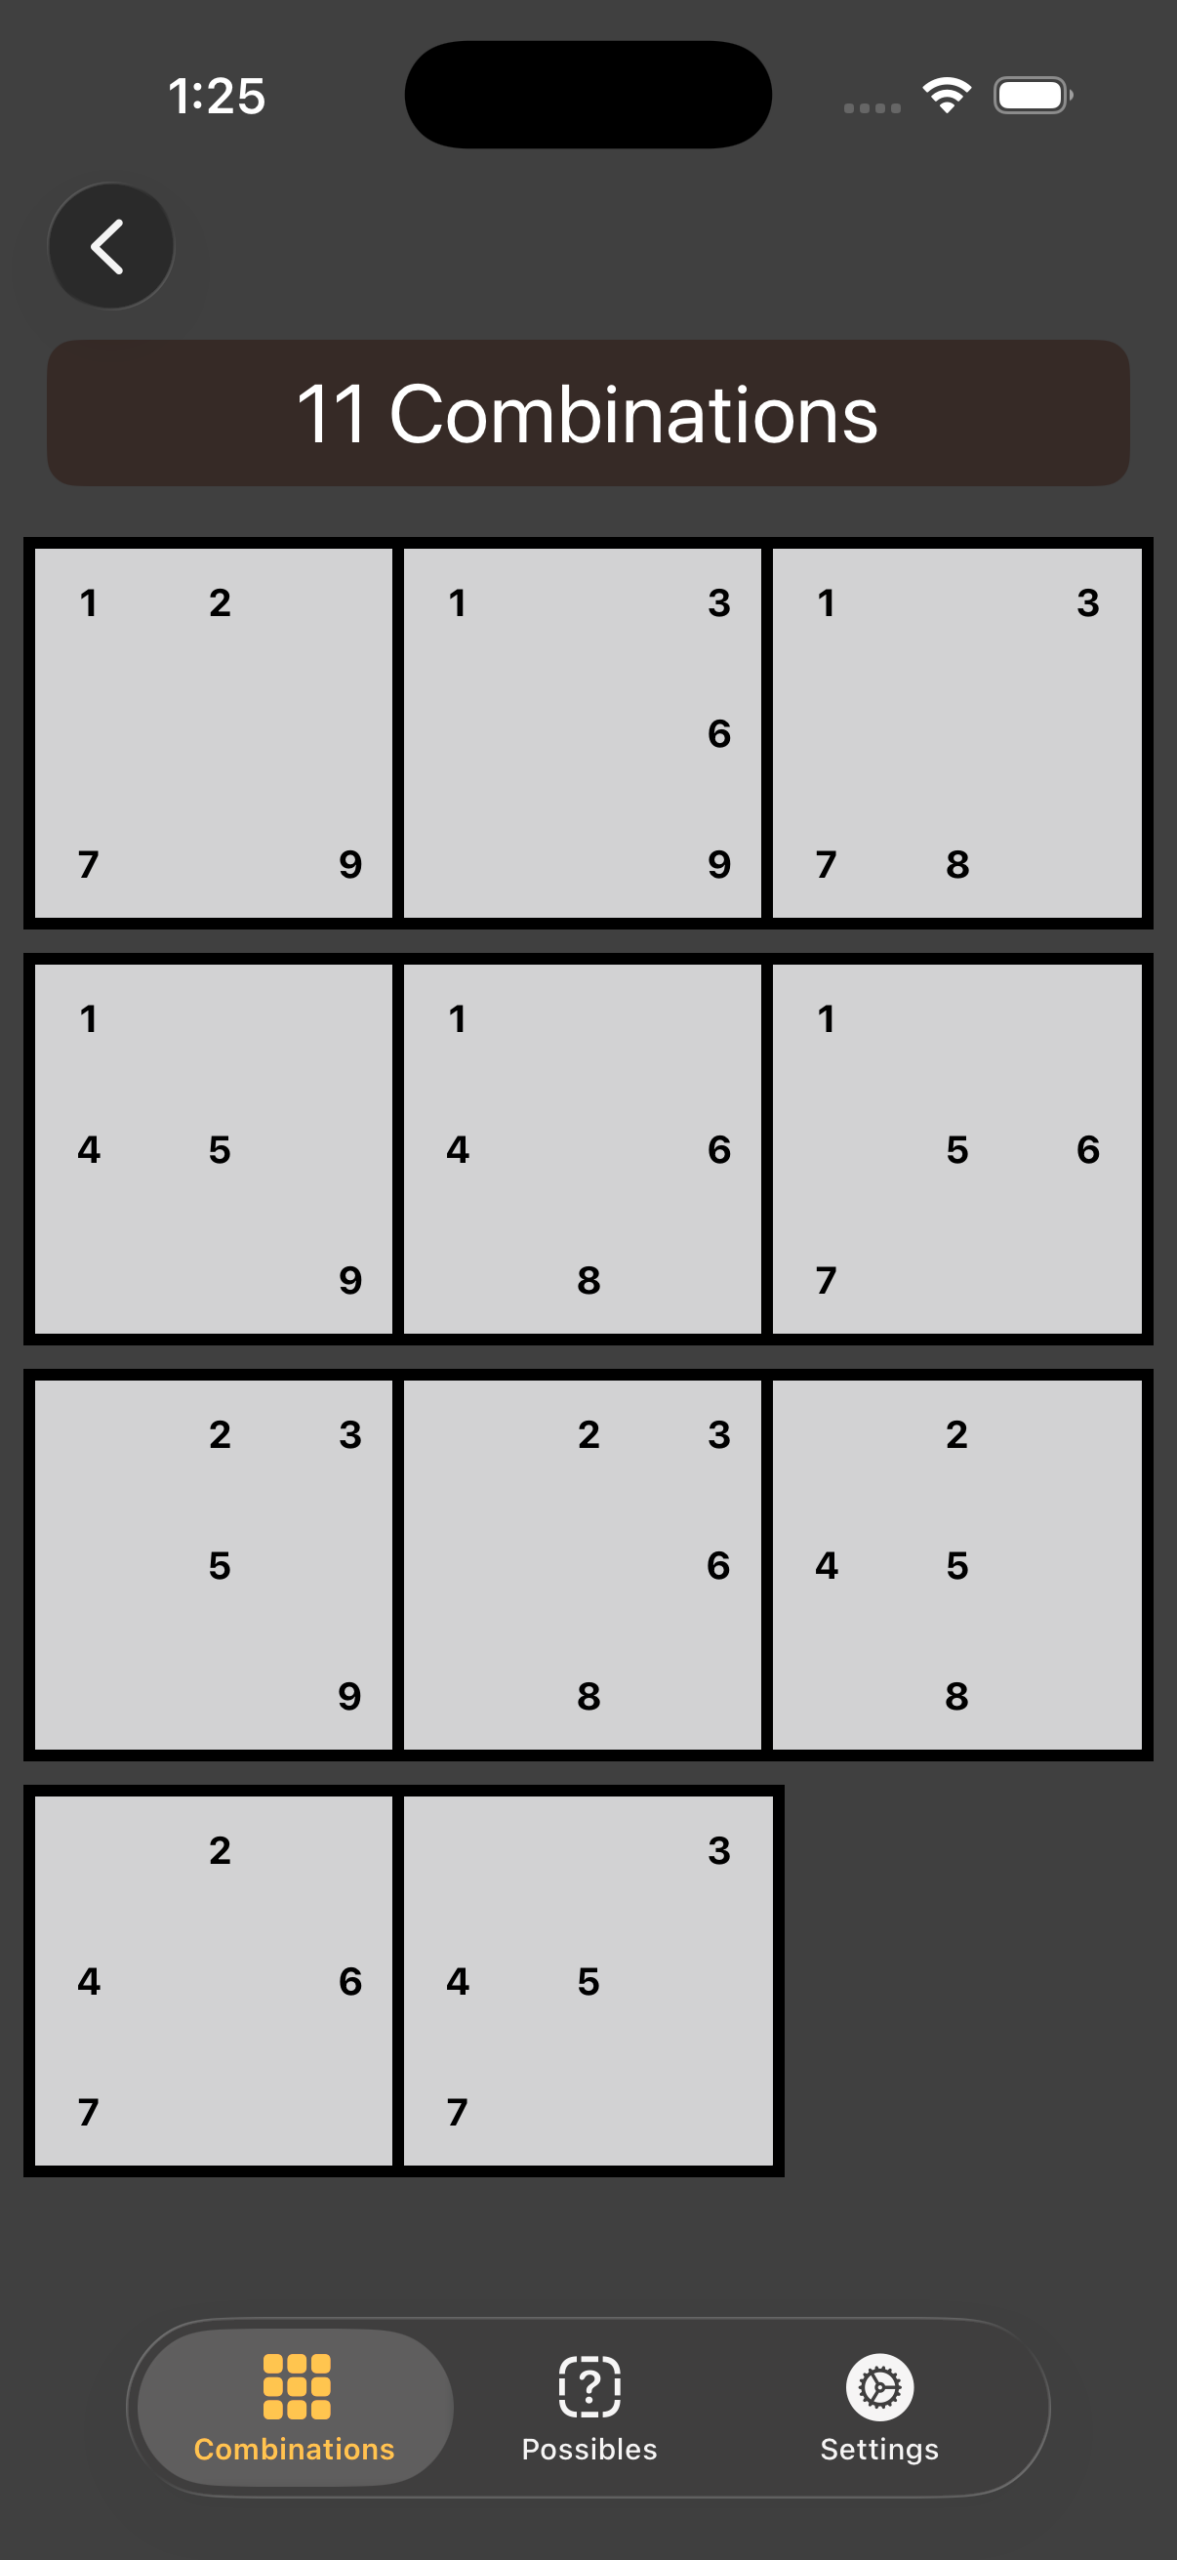
You’ll see eleven grids, each with a different combination. This is essentially the reference sheet displayed in a different fashion. You can swipe back or hit the back arrow at the top to return to the main screen.
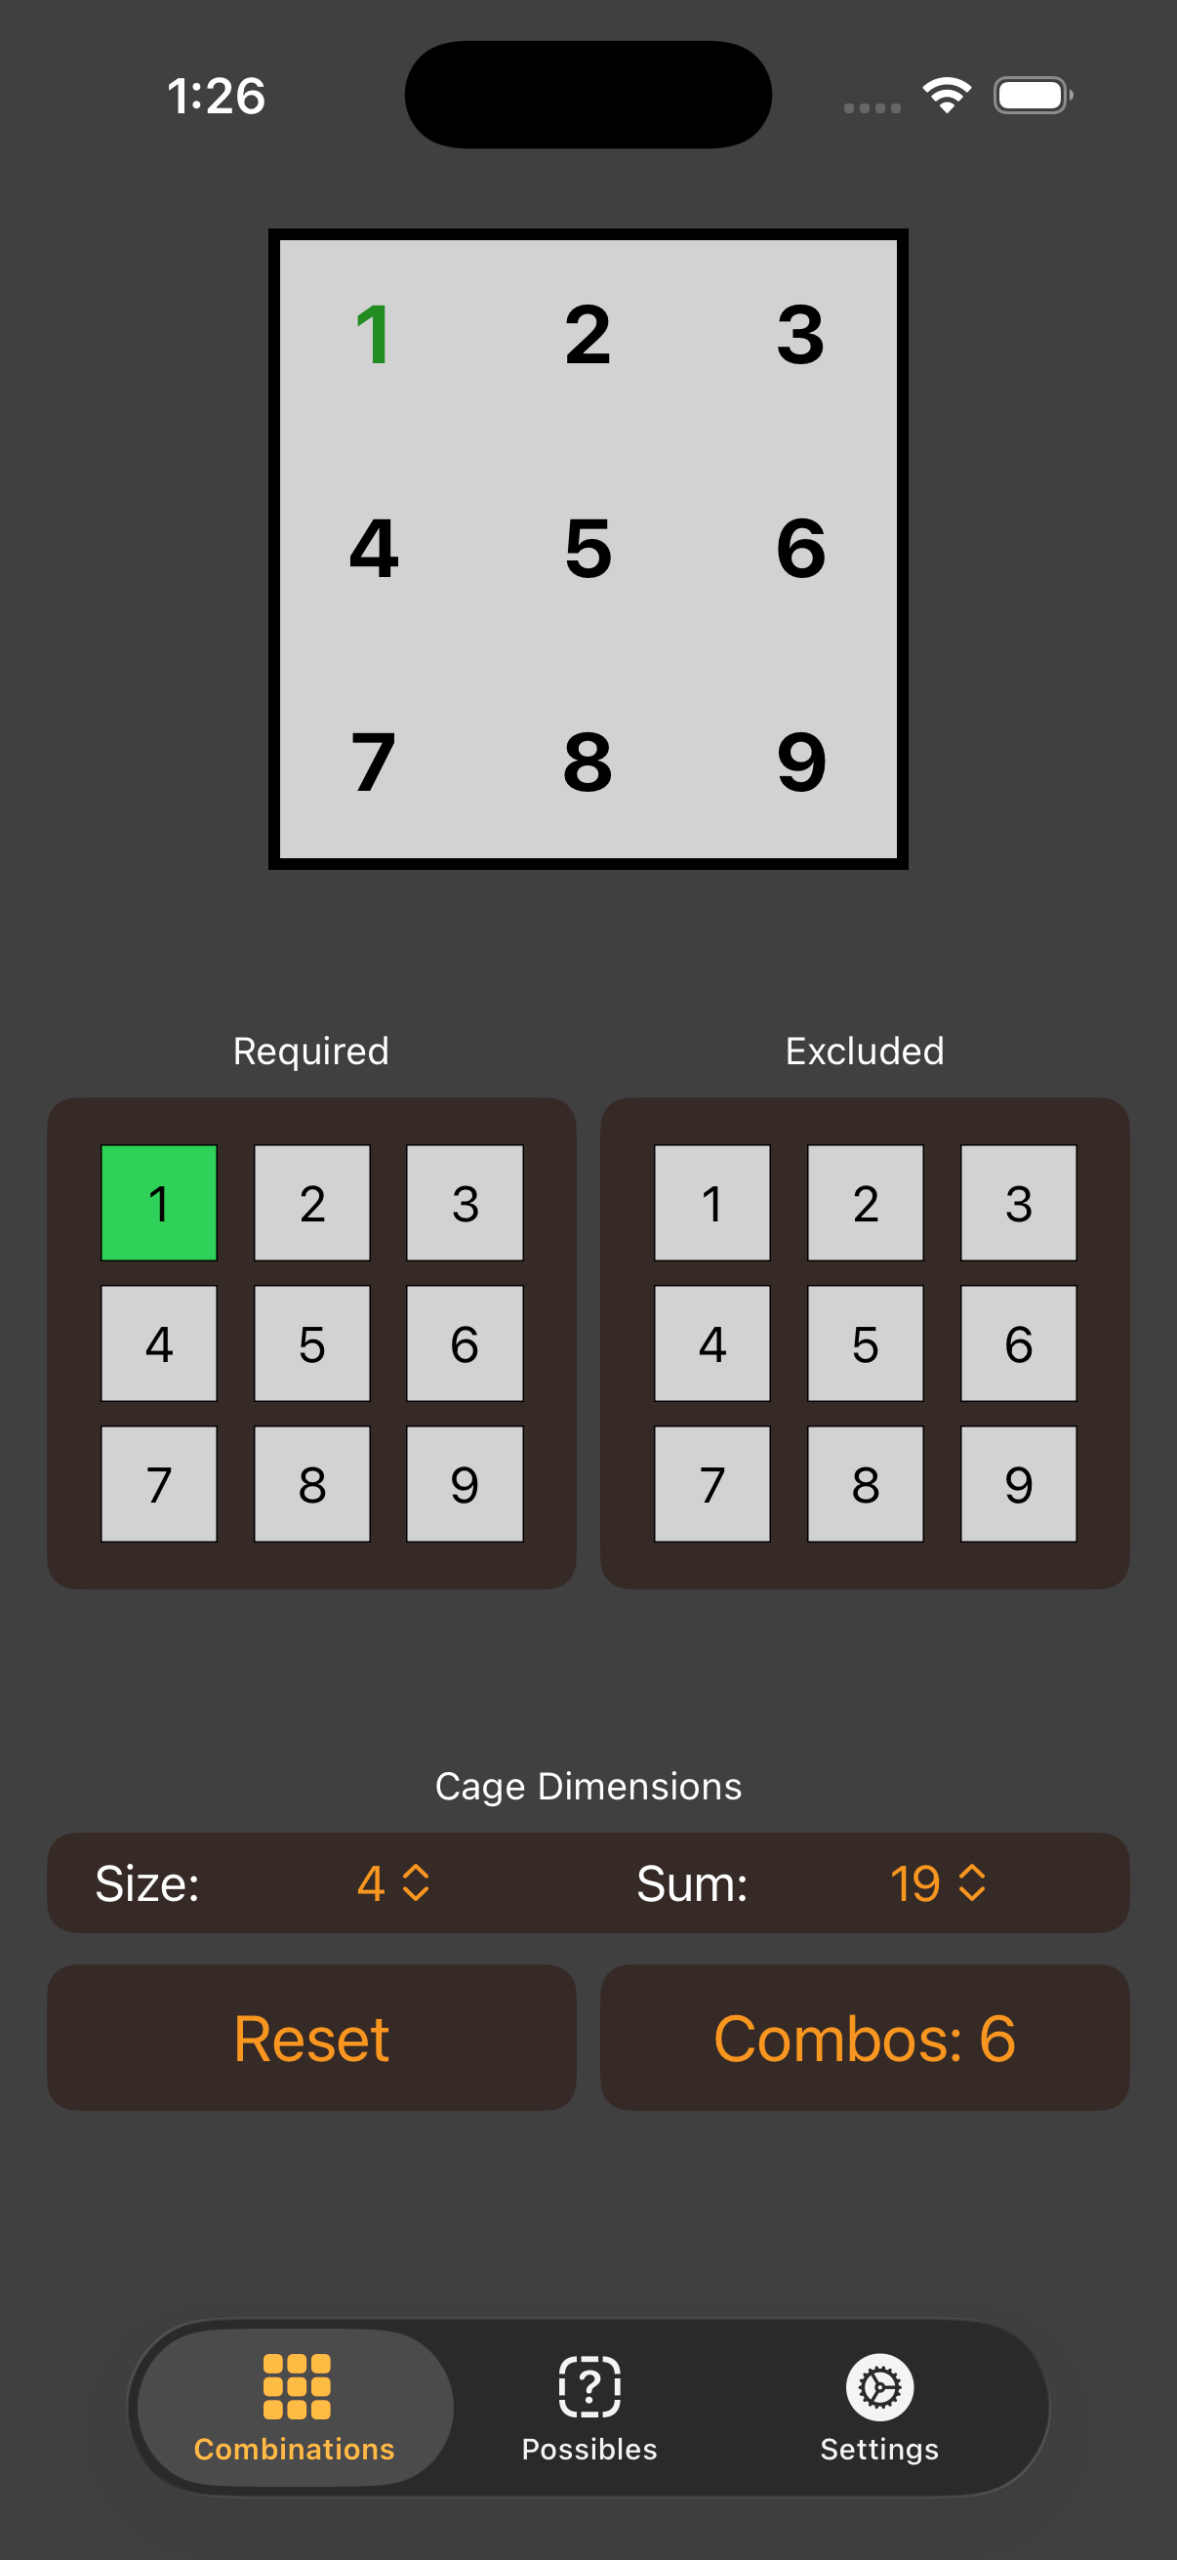
Let’s play around with the Required buttons. Like the excluded ones, these are based on things you’ve narrowed down in the puzzle. If you know that there is a “1” in the cage, hit the Required 1.
The number of Combinations to 6 and the one turns green in the top square. Green signify numbers that this number must be in the cage, and that may be because you’ve told the app that it is required or it has calculated that it is required.
Play around with various combinations of “Required” numbers.
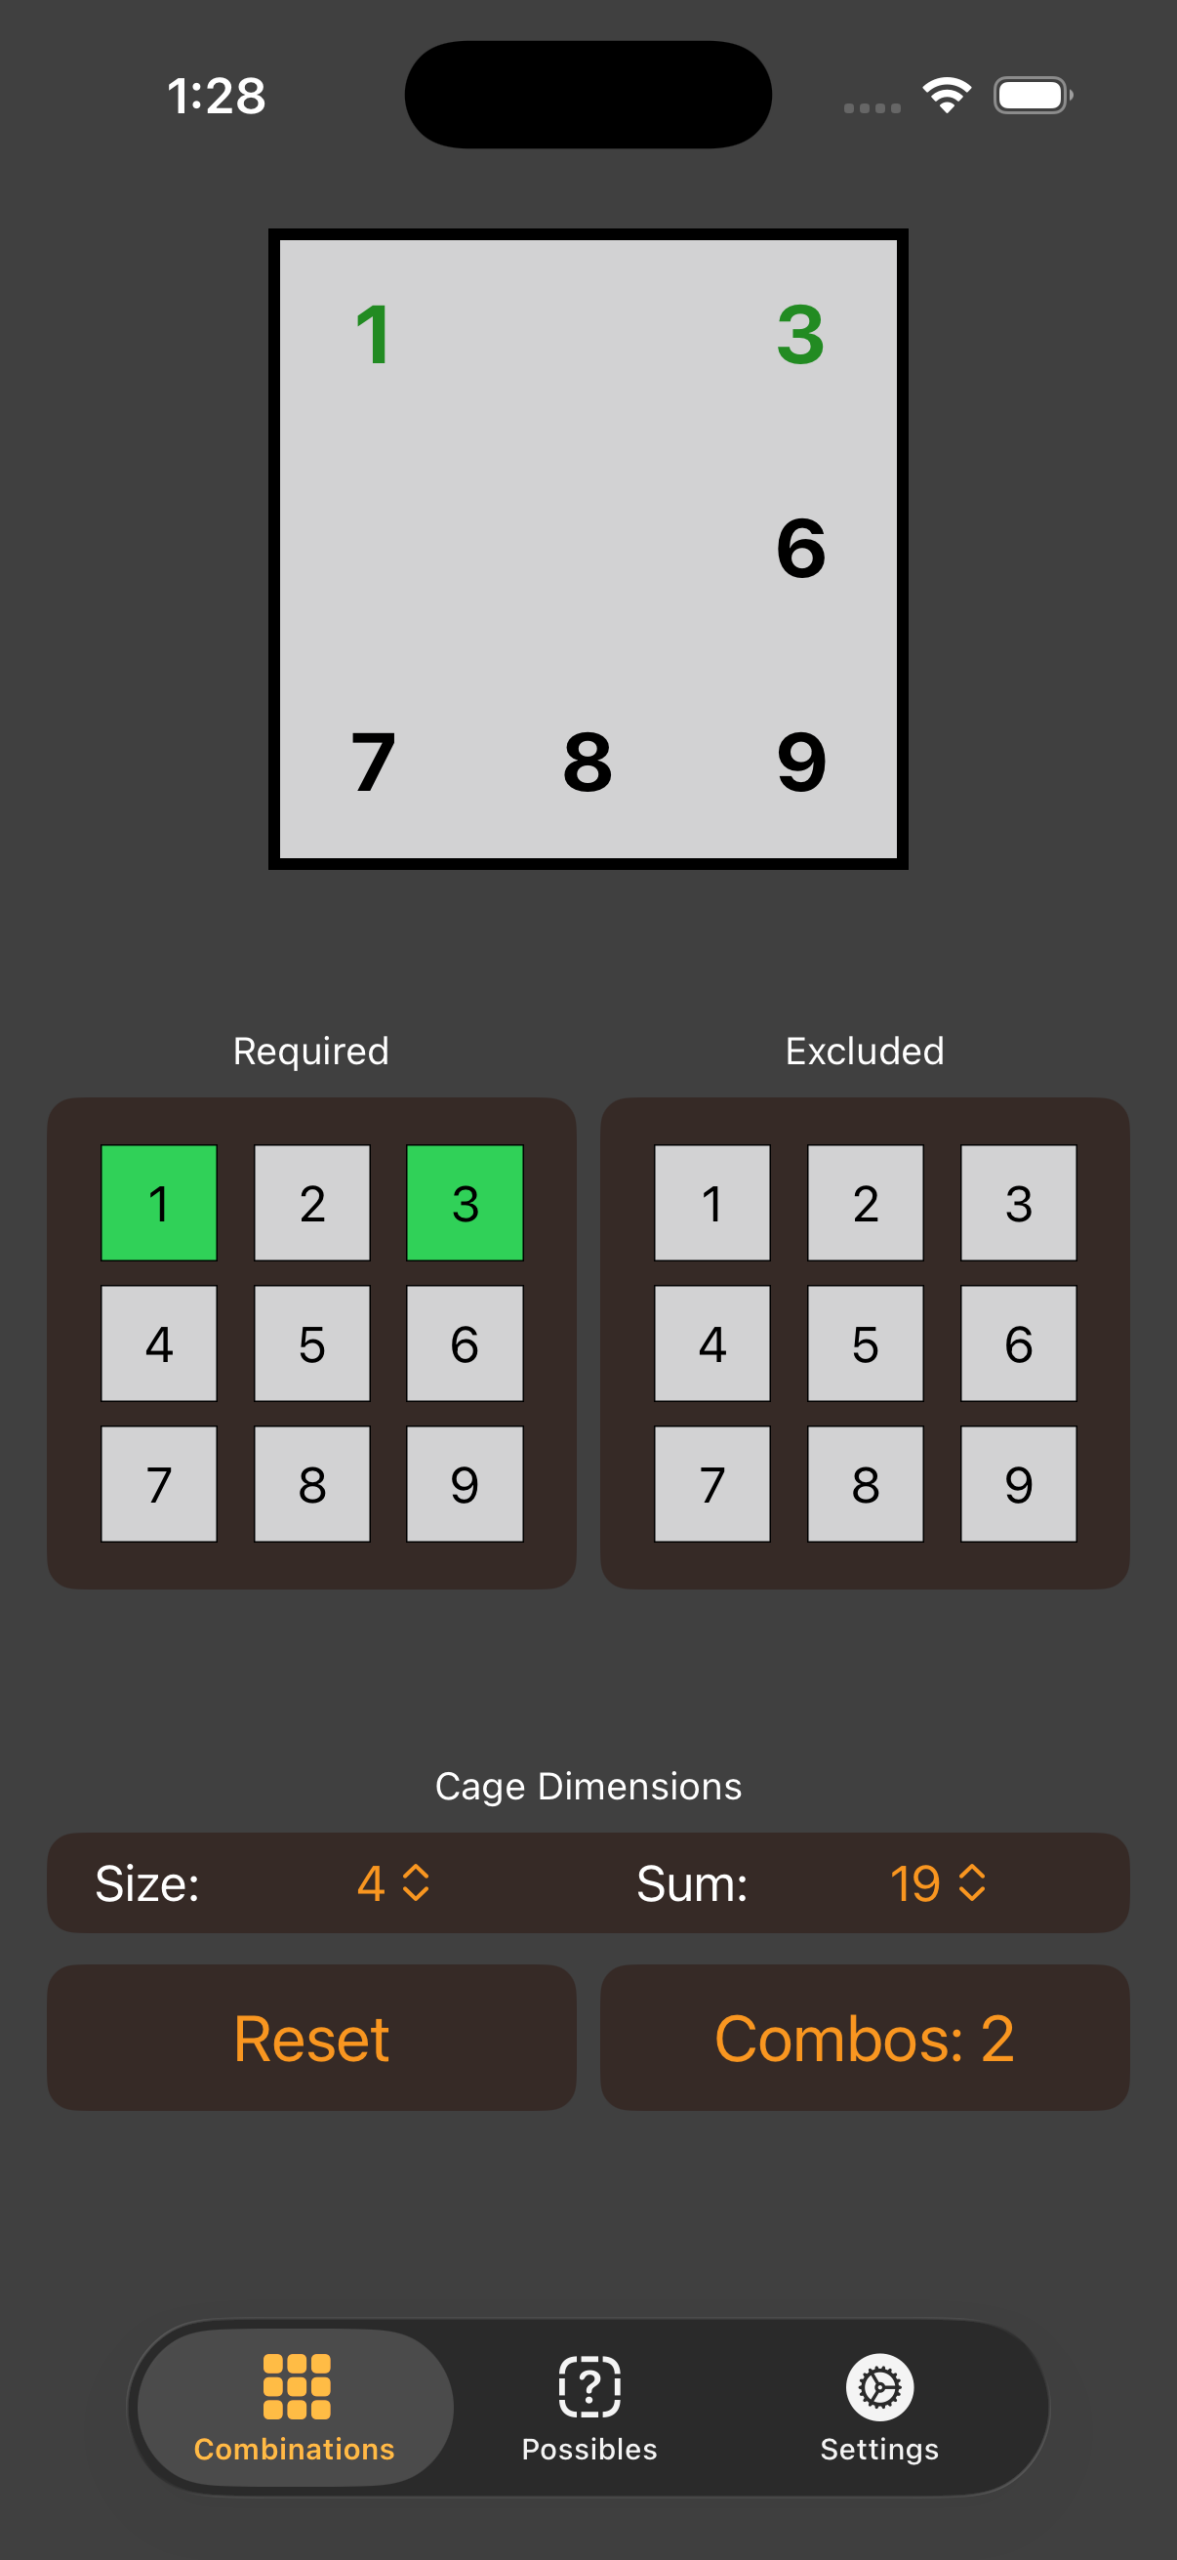
If you select 3 as required, you’ll note that both 1 and 3 are green, the number of combinations drops to 2, and the numbers 2,4, and 5 have disappeared. It is now no longer mathematically possible for any number in your cage to be 2,4, or 5.
If you also knew that there could not be a 9 in the cage, you could exclude 9, and the top goes all green, and all four numbers (1,3,7,8) are green, too. This indicates this is the only possible combination for your cage.
That is how the main function of the app works.
Possibles
I struggle to explain the Possibles Tab, although it can be very helpful in a tricky solve.
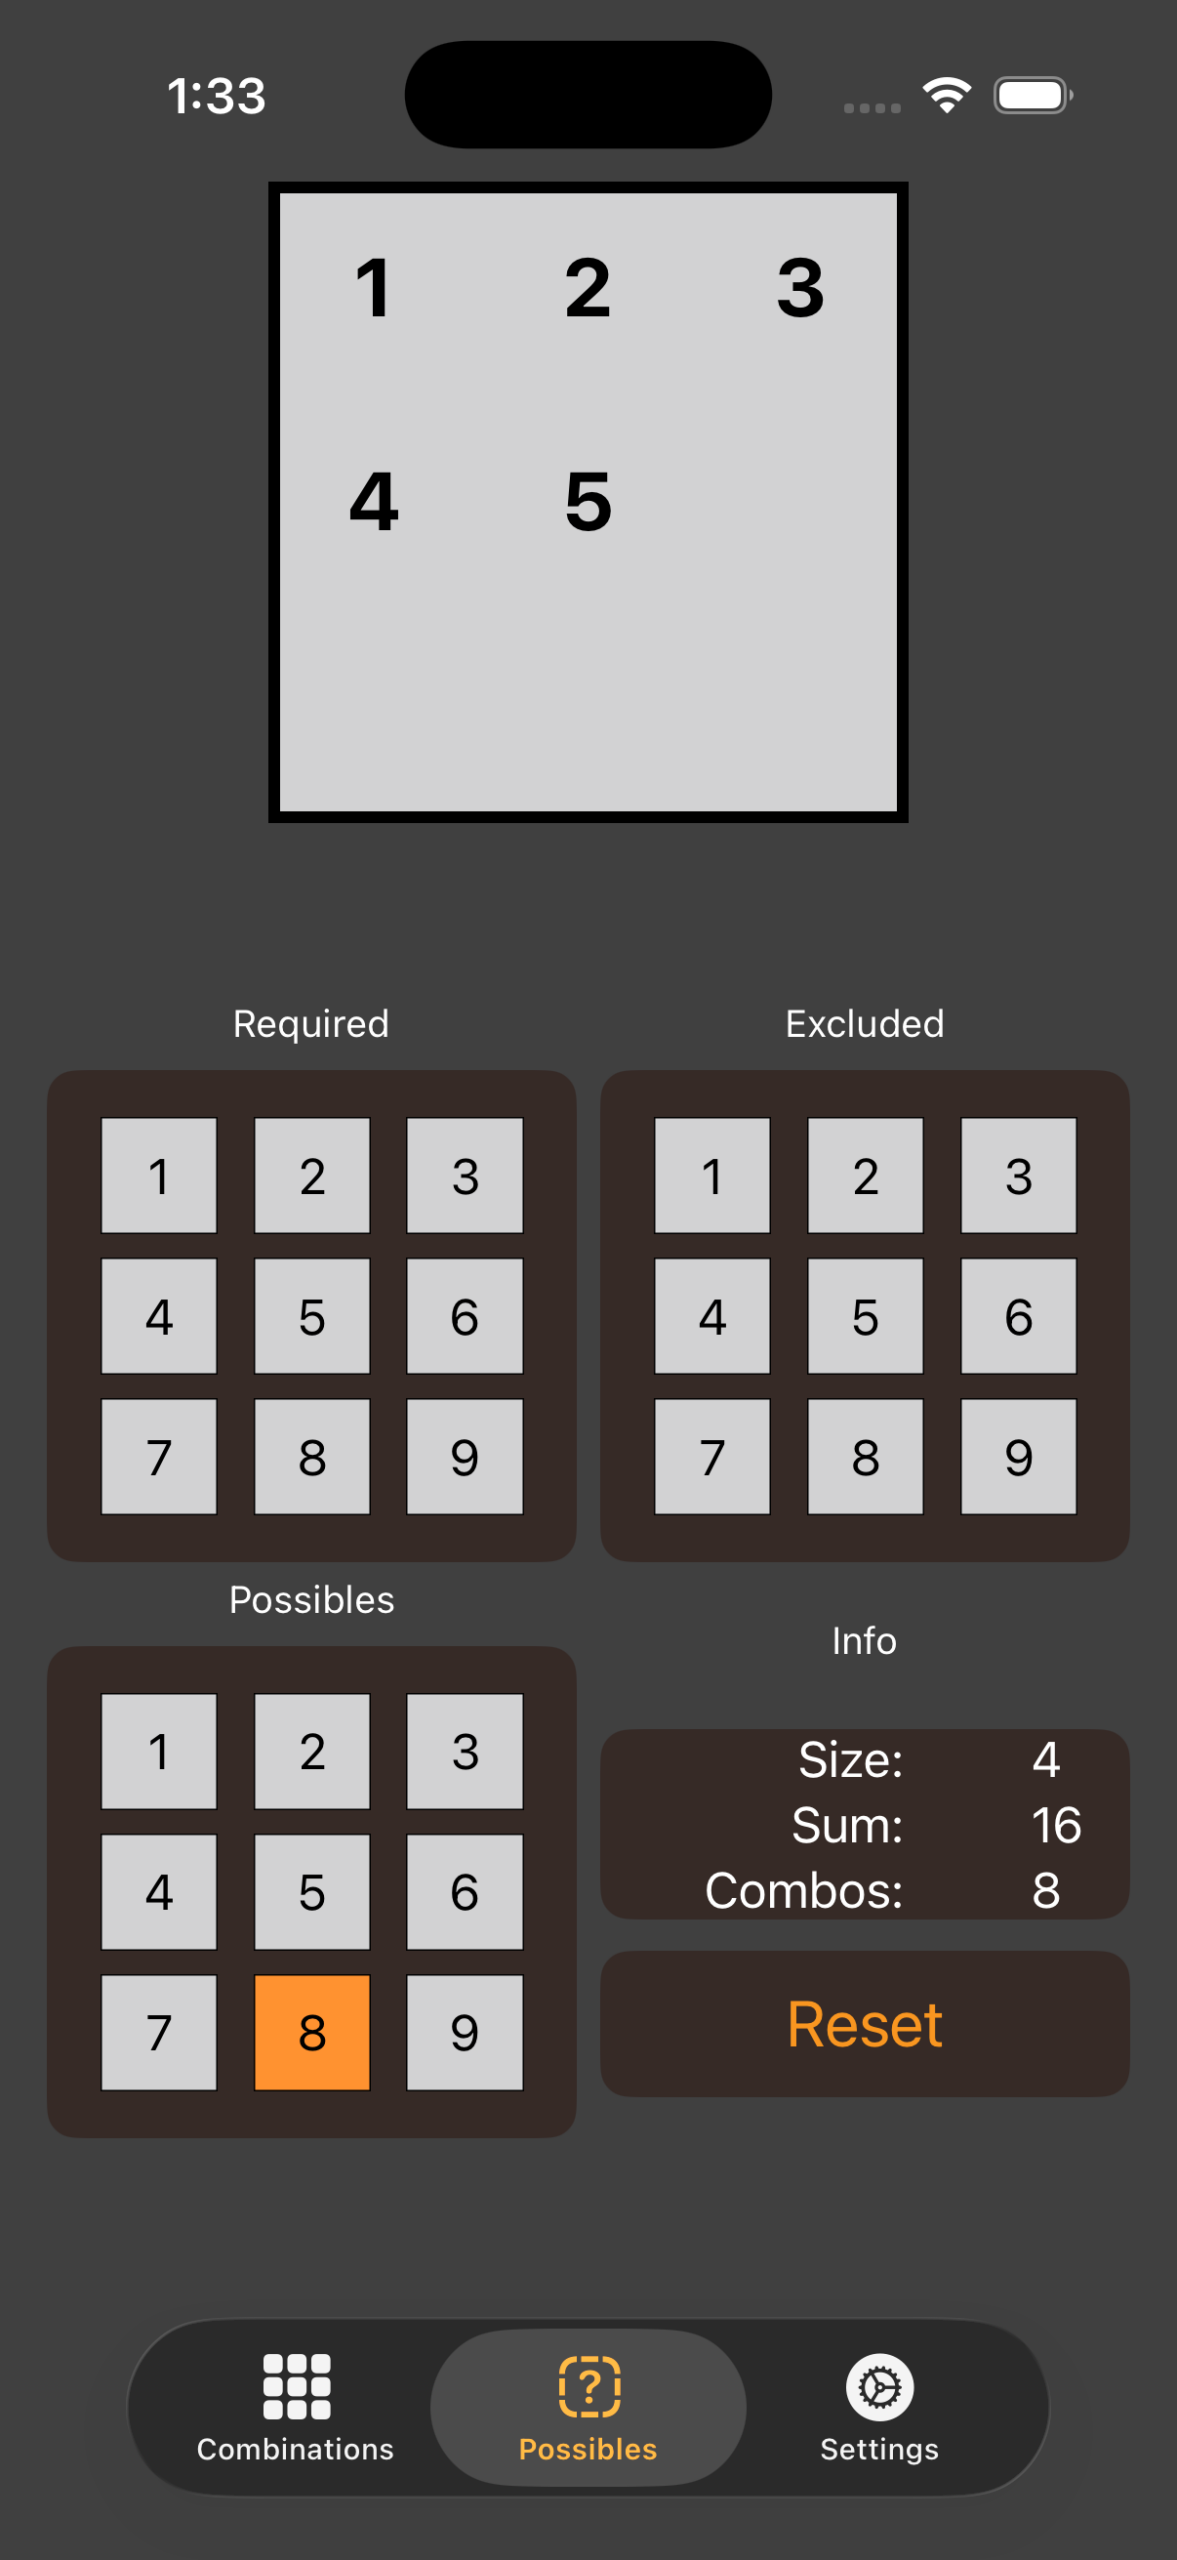
If you had a cage, let’s use [16 in 4], and instead of knowing what anything for certain what any Requirements or Exclusion were, let’s say that you had a square that you have narrowed down to either an 8 or a 9.
Let’s start on the main screen, setup Size 4, Sum 16, and you’re confronted with all 1-9 as valid contents.
Since you know there’s a single cell that’s either 8 or 9, you could click on Required 9, and you’d see that if it’s a 9 there is only 1 possible combination (1,2,4,9)
Unset the 9 requirement, and then select the Possible Tab at the bottom. You’ll get a screen similar the main screen, but with an extra grid called “Possibles” at the bottom. You’ll also note that the top square is empty and red — this just means that the current setting is “impossible.”
On this screen, instead of select 9 as a Requirement, select it as a possible. Note that the top screen now shows (1,2,4)

What that means it that, If you had a square with a 9 in it, the other three squares could each have (1,2,4). Which, if you’ll recall from the previous screen, is just the (1,2,4,9) combination minus the 9.
OK, back to the first screen, and this time, select 8 as a Requirement. Now you’ve got two possible combinations, and not only is 8 required, but all valid combinations have a 1 in them, which is why it is green. Looking at the valid Combos shows (1,2,5,8) and (1,3,4,8).
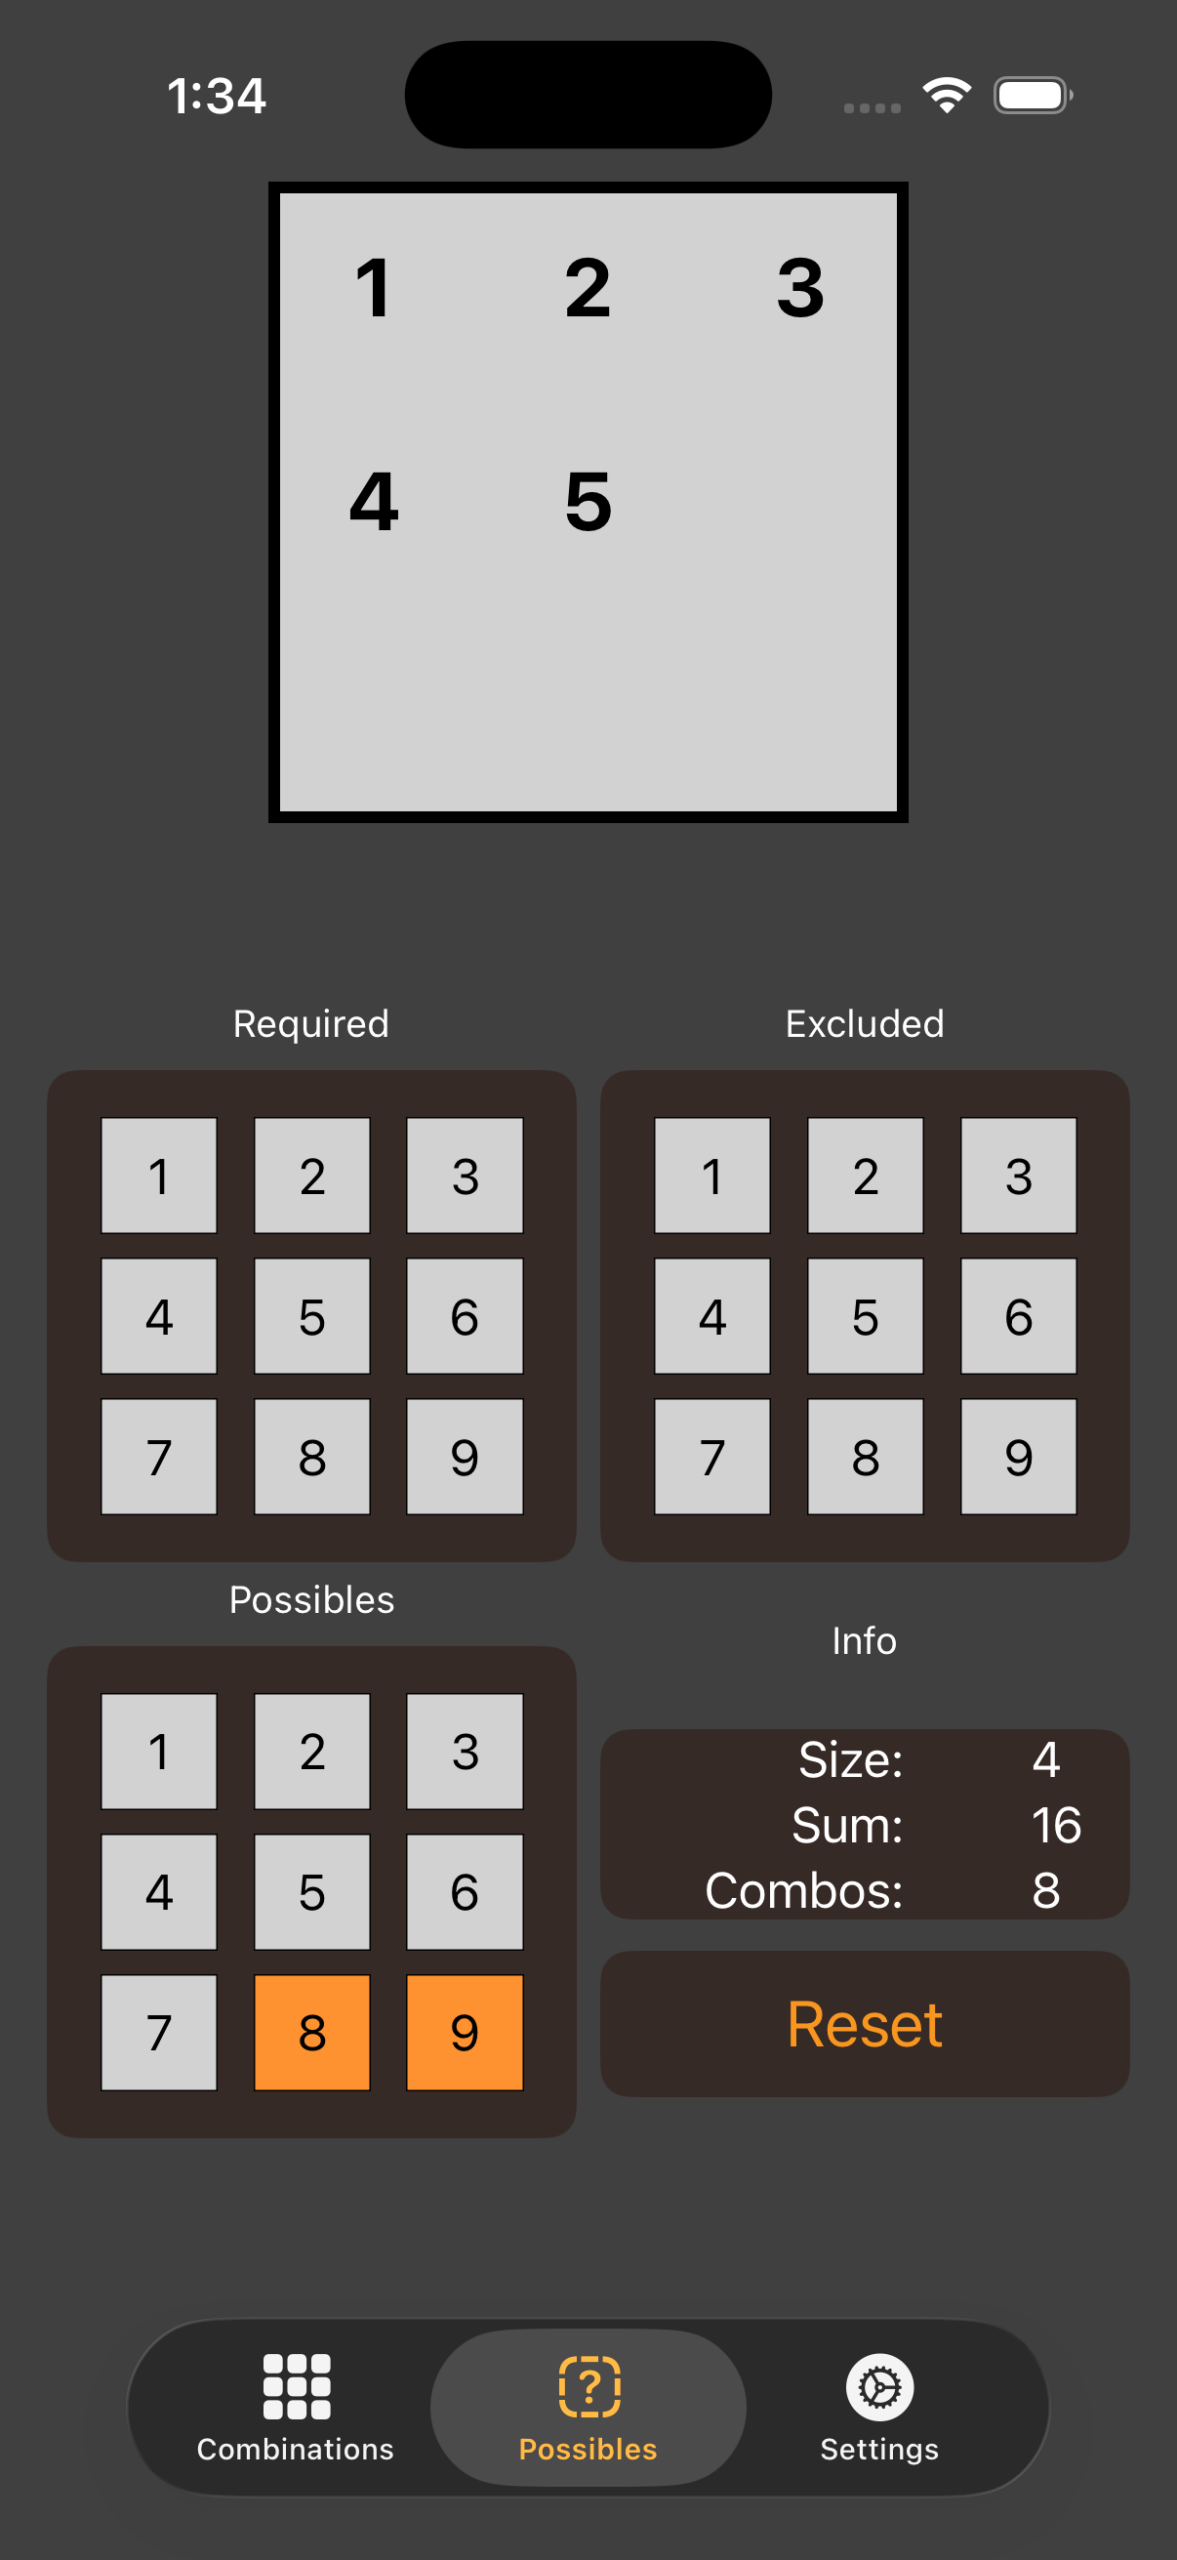
Like before, unset the 8 Requirement and go to the Possibles Tab. Select 8 as a Possible. (If 9 is still selected, unselect it.)
Now the top square shows (1,2,3,4,5) which is the union of the valid combinations (minus the 8): (1,2,5) & (1,3,4).
Again if the square was 8 then the other three squares can only be (1,2,3,4,5).
You’re already being told this information on the main tab, just in a slightly different way. Where it can get useful is back to our premise that we know that a square can only be 8 or 9.
Select both 8 and 9 on the Possibles. Unfortunately, in this example the result is exactly the same as 8 by itself. What you’re getting in the union of the Possible 9 (1,2,4) and the Possible 8 (1,2,3,4,5)
If that square can be only 8 or 9, the others can only be (1,2,3,4,5.)
I find this tool useful when I’m a bit adrift and noodling around trying to identify patterns that might help me solve either this cage, or cages that it might influence.
So, that’s the main two screens. The code underlying them should be unchanged, and they’ve been used on hundreds of games and seem to be correct, although, with any new version, sometimes bugs happen. If you can help test these, that would be great.
Settings
Basically all the changes in this version are either cosmetic (Liquid Glass, new App Icon) or it’s on the Settings page.
In the previous version of the app, light/dark mode followed your system setting. In this version, I added the option to continue to do that, or to force the app into light or dark mode.
The Replay Tutorial is unchanged (or should be.)
The biggest change I’ve made is the tip jar. This is completely new code and tapping into the in-app purchase system through Apple which is a whole new layer of complexity.
Apple’s TestFlight betas allow you to test in-app purchases without actually spending money. Please test it out. Several times. Unfortunately, for some reason I cannot fathom, it does ask for your Apple password. This is Apple’s simulated in-app purchase asking, not my app.
I’ve added two tip levels, Small and Large, which are set at $0.99 and $4.99.
And that’s really all there is to the app. Your help in testing it is really healpful to me. There’s a way to report problems via TestFlight. If you encounter a problem in my app, just snap a screenshot of it, and it should prompt you to send the screenshot and a description of the problem to me.